How Driveway Pressure Washing Works in South Florida
Lorem ipsum dolor sit amet, consectetur adipiscing elit. Suspendisse varius enim in eros elementum tristique. Duis cursus, mi quis viverra ornare, eros dolor interdum nulla, ut commodo diam libero vitae erat. Aenean faucibus nibh et justo cursus id rutrum lorem imperdiet. Nunc ut sem vitae risus tristique posuere.
A clean driveway inSouth Floridausually takes 4 steps: inspection, pre-treatment, controlled washing, and a final rinse. If one step gets skipped, you can end up with lines, patchy results, loose joint sand, or surface damage.
Your driveway gets dirty in a different way here than it does in many inland areas. High humidity, heavy rain, salt air, sand, strong sun, and daily traffic all play a part. That mix leads to algae, mildew, salt residue, sand buildup, oil spots, and fading. It also means Concrete and pavers should not be cleaned the same way, often requiring different power and soft washing techniques.
Here’s the short answer:
Concrete can handle more pressure, but too much force can mark the top layer
Pavers need lower pressure so the joints and sealer are not stripped
Pre-treatment does much of the stain-removal work, especially for algae, mildew, and oil
Surface cleaners help stop striping and keep the finish even
Runoff control matters because water and cleaning mix should stay out of beds and away from the foundation
Most jobs are done in one morning
Foot traffic often returns in about 1 to 4 hours, once the surface dries
South Florida weather speeds up organic growth. Damp, shaded spots can stay wet long enough for slippery green film and dark mildew spots to spread. Near the coast, salt and sand settle into pores and joints, while UV rays make stains stand out more as color fades. On busy driveways, traffic pushes grime deeper into the surface.
The SECRET WAY to Clean a DIRTY Driveway! 🤫| Pressure Washing Basics
On service day, you should move cars, clear small items, and keep pets and kids away until the rinse is done. You can also expect loud equipment, hoses across the driveway, and a short walk-through at the end. The rest of the article explains how each step works and what kind of results you should expect.
Why South Florida Driveways Get Dirtier and Stain Differently
South Florida driveways deal with more than plain dirt. Between humidity, rain, salt air, and sand, grime sinks deeper and stains set in a different way. That’s why concrete and paver driveways here often need a different cleaning approach than driveways farther inland.
Condition
Typical Inland Driveways
South Florida Driveways
Humidity Levels
Low to moderate; dries quickly
High year-round; surfaces stay damp longer
Algae/Mildew Growth
Seasonal or slow
Rapid, year-round organic growth
Salt & Sand Exposure
Minimal
High; settles into pores and joints
Drying Time
Fast
Slow; hindered by rain and humidity
Common Staining
Dirt, dust, vehicle fluids
Algae, mildew, salt residue, and fading
That mix is why concrete and pavers need different pressure settings, pre-treatment, and rinse methods.
How Humidity, Shade, and Rain Speed Up Organic Growth
South Florida’s rain and high humidity keep driveway surfaces damp for longer stretches, especially in shaded spots near trees or covered entryways. Once that moisture sticks around, green algae and black mildew don’t need much else to start spreading.
On concrete, this often shows up as a slick green film or dark spots across the slab. On pavers, it tends to build up in the joints and around the edges where water hangs on the longest. And there’s a safety issue too: that film can make a wet driveway slippery.
The dark streaks on South Florida driveways are usually algae or mildew feeding on trapped moisture and dust.
How Salt Air, Sand, Sun, and Traffic Wear Down Driveways
Near the coast, salt air and fine sand settle into concrete pores and paver joints. Over time, that leads to faster wear and deeper staining than you’d usually see on inland driveways. Strong UV exposure also fades paver color, which makes stains stand out more as the surface ages.
Traffic adds another layer. Cars, guests, and daily use press sand, salt, and oil farther into the surface. In many cases, the wear doesn’t fully show up until the driveway is cleaned. If your driveway has seen heavy repeat use, the damage from that repeated use can build up in ways that aren’t obvious at first.
Those surface conditions shape the pressure and cleaning method used next.
Equipment and Pressure Settings Used on Concrete and Paver Driveways
Concrete and paver driveways don’t get cleaned the same way. Use the wrong pressure or tool, and you can scar the surface or blow out joint sand. That’s why the driveway material shapes the pressure, water flow, and pre-treatment used before washing even begins.
Professional rigs rely on high pressure and high flow to flush porous driveway surfaces and pull out sand, salt, algae, and oil from pores and joints. The main setup usually includes a rotary surface cleaner, a fan-tip wand for edges, and a pump sprayer for pre-treatment. For oil stains, some pro units also use hot water capability to help break down buildup that cold water alone struggles to remove. The setup changes based on the driveway material and the kind of stain being treated.
Feature
Concrete Driveways
Paver Driveways
PSI & GPM Approach
High PSI (4,000+); high flow (about 8 GPM) for deep pore cleaning
Lower, adjusted PSI to protect joints and surface finish
Preferred Tools
Rotary surface cleaner; wand for edges; hot water for oil
Surface cleaner at reduced pressure; detail wand for joints and transitions
Main Risks
Etching the cream layer, striping, exposed aggregate
Dislodging joint sand, damaging existing sealer
Cleaning Concrete: Higher Pressure With Controlled Technique
Concrete can take more pressure than pavers, but that doesn’t mean cranking the machine all the way up. Concrete has a "cream layer" - the smooth outer surface formed during curing. Hit that layer with too much pressure, and you can scar it, open the pores, and make later stains harder to avoid.
That’s where the rotary surface cleaner matters. It helps stop striping, those ugly lines a standard wand can leave when it moves across a big flat area at uneven heights or speeds. Clean, even results come from steady, overlapping passes with the right attachment, not from pushing more PSI.
Cleaning Pavers: Lower Pressure to Protect Joints and Surface Finish
Pavers need a lighter touch because the joints are part of what holds the whole surface in place. The sand between the pavers keeps the driveway stable, so blasting it out with too much pressure can lead to shifting and uneven settling over time. If the pavers have already been sealed, aggressive washing can strip that sealer too.
The surface cleaner still does most of the work, just at a lower setting. Around the garage door, along edges, and through tight walkway transitions, a wand with a controlled fan-tip nozzle takes over instead of the rotary head.
When paver joints have heavy organic buildup, pre-treatment often does more of the work than pressure alone. Letting the cleaning solution sit for a bit before washing means less force is needed afterward, which helps protect both the joints and the surface finish.
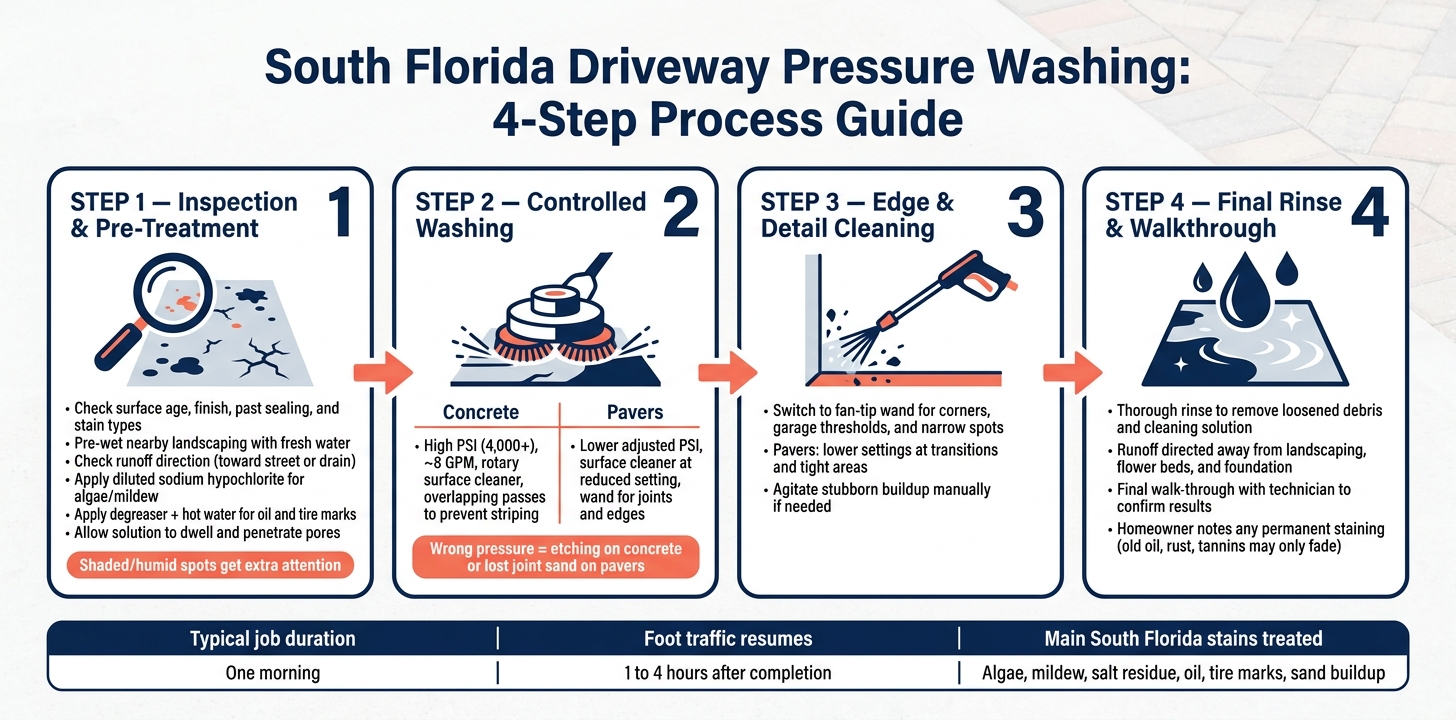
The Cleaning Process: From Pre-Treatment to Post-Rinse
South Florida Driveway Pressure Washing: 4-Step Process Guide
Inspection, pre-treatment, washing, and rinsing each handle a different part of the job.
Inspection and Pre-Treatment for Algae, Mildew, Tire Marks, and Oil
Before any water hits the driveway, the technician checks the surface for age, finish, past sealing, and the type of stain in play. That matters because algae, mildew, and oil stains don't respond to the same treatment. In South Florida, shade and humidity help these stains stick around longer.
The crew also pre-wets nearby landscaping with fresh water and checks where runoff will go. The goal is simple: move water toward the street or a proper drain, not into flower beds or under the foundation.
Then the pre-treatment starts. Diluted sodium hypochlorite is used for algae and mildew, while degreaser and hot water help loosen oil and tire marks. The solution sits for a bit so it can sink into the pores of concrete or pavers. On stubborn spots, the technician may lightly agitate the area to help break up the buildup. Heavy guest traffic can press dirt deeper into the surface, which makes this step even more important. Busy driveways with repeated guest traffic are a good example of how this layering builds up over time.
That prep helps the crew clean the main surface with less pressure.
Washing Passes and Edge Cleaning
For the main slab, the crew uses a rotating surface cleaner in overlapping passes. This helps produce an even finish and cuts down on striping. Concrete can take higher pressure when the work is done with control and care.
At corners, garage thresholds, and narrow spots near landscaping, the technician switches to a pressure wand for detail work. Pavers are cleaned at lower settings during edge work and in tight transition areas.
Final Rinse, Runoff Control, and What Results to Expect
After the washing passes, the crew gives the driveway a thorough rinse to clear away loosened debris and any leftover cleaning solution. Runoff is kept moving away from landscaping, flower beds, and the foundation so the surface can dry evenly without residue.
Homeowners should expect a uniform finish, with edges and joints cleaned to match the main slab. Algae and mildew often come off fully when the pre-treatment has done its job. Older oil stains, rust, or leaf tannins may only fade instead of vanish, especially if the surface is etched or patched. A final walk-through with the technician helps confirm what came off and what may be permanent staining.
Those results shape what homeowners will notice on service day.
What to Expect on the Day of Service
After the inspection and pre-treatment, the visit usually turns into a straightforward access-and-clean routine. Most crews show up in the morning so they can wrap up before South Florida’s afternoon storms roll in.
How to Prepare Before the Crew Arrives
Move all vehicles off the driveway and clear portable items like potted plants, toys, and outdoor furniture so the crew can reach the full surface. Make sure your outdoor water spigot is on and easy to access. It also helps to keep nearby windows and doors closed before the work starts.
If there are shaded corners where algae tends to build up, deep oil spots, or loose pavers that need a lighter touch, point those out early. That gives the crew a better read on pressure settings and pre-treatment before the first pass.
What Happens During and After the Cleaning
Expect some noise. The equipment is loud, and hoses will run across the driveway while the cleaning is underway. Keep children and pets away until the final rinse is done and the surface is no longer slippery. You may also notice a light cleaning odor for a short time after rinsing.
Here’s how the service day usually goes:
Phase
What to Expect
Before service
Vehicles moved off the driveway; portable items cleared; windows and doors closed; water spigot accessible
During service
Loud equipment, hoses across the driveway, and restricted access
Immediately after
Final rinse, runoff control, and walkthrough; surface is wet and may have a faint cleaning odor
Later the same day
Foot traffic usually resumes once the surface is dry, often 1 to 4 hours after completion
Most driveway cleanings finish in one morning. Pricing depends on square footage, surface type, and how severe the staining is. Palm Shine Pros structures quotes the same way across Miami-Dade, Broward, and Palm Beach. See the 2026 Pressure Washing Prices Miami: What Homeowners Pay guide for more detail.
FAQs
Will pressure washing remove all oil stains?
Not always. Pressure washing works well for driveway upkeep, but it won't remove every oil stain.
Here's the issue: concrete and pavers are porous. Oil can sink deep into the surface, and once that happens, standard pressure washing may not pull all of it out.
For better results, technicians often pre-treat oil spots with professional-grade degreasers and surfactants. Then they flush the area with high-flow heated water to loosen and wash away as much oil as possible.
Can pressure washing damage pavers or concrete?
Yes. If you do it the wrong way, pressure washing can etch, scar, or wear down concrete. And with pavers, too much force can wash out the joint sand. That can cause the pavers to shift or sink over time.
That’s why pros take a more careful approach. They usually work with lower pressure settings, around 1,200 to 2,000 PSI, instead of blasting the surface at full force. They also use tools like rotary surface cleaners, which help keep the spray at a steady, safe distance.
Another smart step is to test a small hidden area first. It’s a simple way to make sure the settings are right before cleaning the whole surface.
How long before I can walk or park on the driveway?
After professional pressure washing, let the driveway dry all the way before you use it again. In South Florida, that usually means waiting 24 to 48 hours, based on humidity.
If the surface has been sealed, wait 2 to 4 hours before light foot traffic and 24 to 48 hours before parking a vehicle. That extra time helps avoid trapped moisture and uneven wear.
.avif)

.avif)