Power Washing a Driveway: What Miami Pros Actually Do
Lorem ipsum dolor sit amet, consectetur adipiscing elit. Suspendisse varius enim in eros elementum tristique. Duis cursus, mi quis viverra ornare, eros dolor interdum nulla, ut commodo diam libero vitae erat. Aenean faucibus nibh et justo cursus id rutrum lorem imperdiet. Nunc ut sem vitae risus tristique posuere.
If I want a Miami driveway cleaned without damage, I don’t start with pressure. I start with the surface, the stains, and the runoff plan.
That’s the short answer. On a Miami driveway, pros usually:
check the material first, especially if it’s concrete, pavers, travertine, or Oolite
look for cracks, spalling, loose joint sand, and old sealer
pretreat algae, oil, rust, tire marks, and grime before washing
match pressure to the surface, from under 500 PSI for delicate stone to 2,500–3,500 PSI for standard concrete
rinse, inspect, and wait about 48 dry hours before sealing
Miami adds extra problems. I’m dealing with humidity, salt air, irrigation rust, palm stains, and fast algae growth. That’s why a driveway job here is less about brute force and more about doing the steps in the right order.
Here’s the whole process in plain English: inspect first, protect the property, treat each stain the right way, wash with control, then check if sealing makes sense for the surface and the weather.
How pros pretreat mildew, tire marks, oil, and rust
Once the driveway is protected, crews move straight into pretreatment. Pros start with pretreatment, not pressure, because the goal is to loosen grit and stains before the wash starts. Then the pressure wash can finish the job cleanly instead of fighting stuck-on buildup.
Match the cleaner to the stain and surface
The cleaner has to match both the stain and the surface. That’s the whole game.
Mildew and algae usually get a sodium hypochlorite mix or an enzyme cleaner so the growth is killed before washing. Oil and grease call for an alkaline degreaser that breaks down petroleum at the source. Rust stains need an oxalic acid cleaner, followed by neutralization. Tire marks are treated with a degreaser plus controlled pressure, and deep marks may need a second pass.
Surface type can change the plan fast. On standard poured concrete, these products are usually pretty straightforward to apply. But on travertine, oolite, and other limestone-based pavers, acid-based rust removers and harsh degreasers can etch the surface for good. In those cases, stone-safe, pH-neutral, or enzyme cleaners are the safer option.
After the crew picks the right cleaner, they apply it in a controlled pattern.
Apply pretreatment in the right order
First, the crew sweeps or blows away loose debris before any liquid goes down. If they skip that step, leaves and sand turn into sludge, and that sludge keeps the cleaner from reaching the surface. From there, treatment starts at the high side and moves downward so runoff doesn’t dirty areas that are already cleaned.
Miami heat adds another wrinkle. Detergents can dry on the surface before they’ve had enough time to work, which may leave a film or cause secondary staining. So crews keep the treated area damp during the dwell period. For heavy oil spots, they may do some light brushing after the product has had time to loosen the stain.
Common driveway stains and pro treatment methods
Typical pretreatment ranges look like this:
Stain Type
Cleaner Used
Dwell Time
Agitation Needed?
Mildew / Algae
Sodium hypochlorite or enzyme cleaner
10–15 min
Rarely
Oil / Grease
Alkaline degreaser
10–15 min
Yes, for heavy spots
Rust
Oxalic acid-based (must neutralize)
10–15 min
Minimal
Tire Marks
Degreaser
10–15 min
Yes
Light Grime
pH-neutral stone cleaner
5–10 min
Light
Once the stain chemistry has had time to work, the surface cleaner can make an even pass without chasing leftover spots.
sbb-itb-20350f7
The washing technique that cleans concrete without damaging it
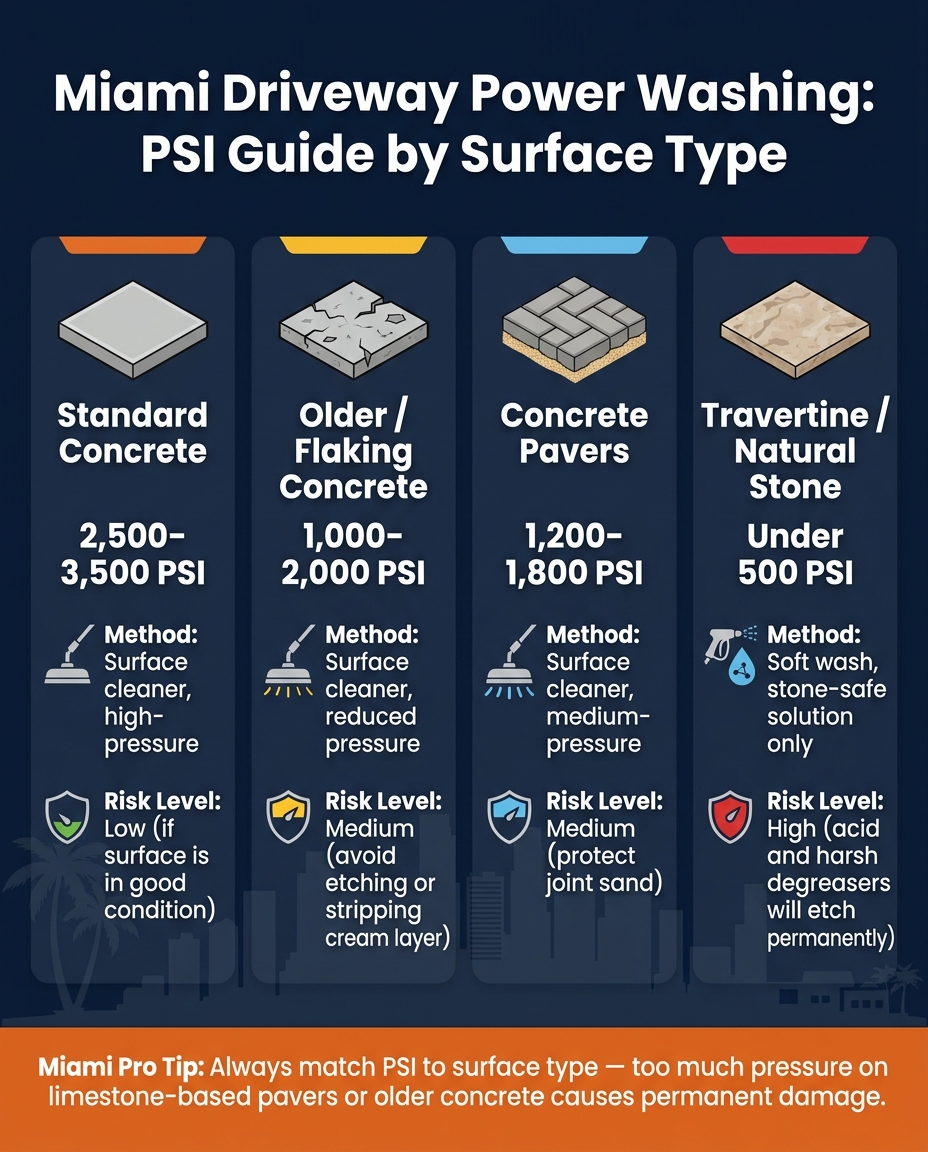
Miami Driveway Power Washing: PSI Guide by Surface Type
Once the stains are loosened, the next step is a controlled cleaning pass. That’s where pros separate a clean driveway from one that ends up with stripes, etched spots, or blown-out joints.
Use a surface cleaner for the main driveway area
For the main driveway area, pros use a surface cleaner and move it at a steady pace with a slight overlap. That overlap helps prevent striping. They usually start near the garage and work toward the street, so dirty water and loosened debris move away from areas that are already clean.
Adjust pressure for concrete, older slabs, and pavers
Pressure depends on the surface. A newer poured concrete driveway can usually take more force than an older slab. And in Miami, limestone-based pavers need a lighter touch.
Standard poured concrete can usually handle 2,500–3,500 PSI. Older or flaking concrete should be cleaned at about 1,000–2,000 PSI to help avoid etching or stripping off the smooth cream layer.
Pavers and natural stone need more care. Concrete pavers often call for 1,200–1,800 PSI because too much pressure can blow out the joint sand that keeps the blocks in place. Travertine and other delicate stone surfaces should stay under 500 PSI and be washed with stone-safe solutions.
Surface Type
Recommended PSI
Method
Standard Concrete
2,500–3,500
Surface cleaner, high-pressure
Older / Flaking Concrete
1,000–2,000
Surface cleaner, reduced pressure
Concrete Pavers
1,200–1,800
Surface cleaner, medium-pressure
Travertine / Natural Stone
Under 500
Soft wash, stone-safe solution
Finish edges, corners, and the final rinse correctly
Edges and corners are handled with a wand. The nozzle stays at a shallow angle to help protect joints and caulking.
Then comes the final rinse. Pros rinse from the garage toward the street so runoff moves off the driveway instead of back across the clean surface. After that rinse, the slab is ready for inspection.
What happens after the wash and when sealing makes sense
Rinse, neutralize, and inspect the finished surface
Once the final rinse is done, pros don’t just pack up and leave. They take another look at the driveway before deciding if sealing is worth it.
That last rinse clears away leftover detergent and debris. The crew also rinses nearby landscaping, sidewalks, and pool decks to help prevent chemical damage or runoff.
From there, they do a full walk-through. This is where small issues tend to show up. Faint stains may still need a spot touch-up, and a clean surface makes cracks, low spots, and etching much easier to see. With pavers, there’s one more thing to check: whether the pressure washing moved any joint sand. That sand helps keep the pavers in place, so it matters.
Plan around South Florida weather and drying time
Timing matters more than most people think. In South Florida, heat and afternoon storms can shrink the margin for error.
Early scheduling usually works better because direct afternoon sun can dry cleaning solutions too fast, which may leave a white film on the concrete.
Rain also makes dry time harder to predict. And if sealing is part of the job, the surface must be fully dry. That means 48 dry hours after the final rinse before any sealer is applied.
The best time for a wash-and-seal job is usually:
November through December, after hurricane season
March through April, before the summer rains begin
Dry time and surface type are what decide whether sealing is money well spent.
Cleaned driveway vs. cleaned-and-sealed driveway: a side-by-side look
Sealing isn’t a one-size-fits-all call. It depends on the material, the age of the driveway, and the property’s location.
Pavers, including limestone-based pavers, almost always do better with sealer. It helps replace joint sand, protect color, and slow down the fast algae regrowth that Miami humidity tends to bring. Concrete slabs can stay bare, but older or more porous concrete soaks up oil and rust stains much faster, which makes sealing a smart add-on in many cases.
Professional paver re-sanding and re-sealing usually adds $0.25–$0.60 per square foot to the total job cost. For standard concrete, sealing usually costs $0.15–$0.30 per square foot.
Enhanced color; matte or "wet look" finish available
Stain Resistance
Low; oil and tannins absorb quickly
High; creates a barrier against oil, rust, and moisture
Longevity
Exposed to UV and salt air erosion
Extends surface lifespan by 5–10 years
Safety
Algae returns quickly; surface can get slippery
Often includes anti-skid additives for traction
After sealing, foot traffic can usually return in about 4 hours. Vehicles should stay off the driveway for 24 hours. After that, simple upkeep habits make the next buildup take longer.
How to keep a driveway cleaner between professional washings
Habits that slow down staining and algae growth
Miami’s humidity and frequent rain speed up algae and grime, so a few simple habits can help keep buildup in check.
Sweep off leaves and debris once a week. Every few weeks, hose down tire tracks. After storms, push away standing water with a squeegee or broom. It also helps to trim nearby plants and trees so the driveway gets more sun and less dropped debris.
It’s also smart to keep an eye out for fresh oil drips and irrigation overspray. In South Florida, well water often carries minerals that can leave orange rust stains on concrete and pavers over time. Pointing sprinkler heads away from the driveway is a small change, but it can stop a problem that keeps coming back.
For pavers, stick with a hose rinse only. High pressure can remove joint sand and leave you dealing with re-sanding later.
These steps slow down buildup, but they don’t replace periodic professional washing.
When Miami driveways need another professional cleaning
Even with steady upkeep, Miami driveways often need professional cleaning every 6 to 12 months.
Shaded driveways, especially under dense tree cover like you often see in Coral Gables, can start building up slippery algae and mildew in as little as 3 to 6 months. That’s not just about looks. Wet algae on a driveway or walkway can create a serious slip-and-fall risk.
If buildup comes back fast on a shaded driveway or a paver surface, it makes sense to shorten the cleaning schedule.
And if stains reappear fast or daily traffic leaves new scuffs, book the next cleaning sooner.
Conclusion: the steps that produce a clean result without surface damage
A driveway that stays clean for months usually comes down to doing the job in the right order. First comes a careful surface inspection. Then stain-specific pretreatment. After that, controlled pressure with the right equipment. Last, a careful post-rinse walkthrough.
When one of those steps gets skipped, problems tend to follow. Maybe pretreatment gets rushed. Maybe too much pressure gets used on older concrete or limestone pavers. That's when surfaces get damaged and the finish doesn't last.
That's the standard Palm Shine Pros holds to: a driveway that looks clean and stays protected without harming the surface underneath.
FAQs
Can power washing crack a driveway?
Not when pros handle it the right way.
Cracking, scarring, etching, or shifting usually happens when someone uses too much pressure or points the nozzle at the wrong angle for that surface. That’s where problems start.
Professionals avoid damage by matching the pressure to the material. For concrete, that’s usually 2,500–3,500 PSI. For pavers, it’s often 1,200–2,000 PSI. Done this way, the surface gets cleaned without taking a beating.
Regular professional cleaning can also help prevent long-term surface wear.
Do all driveway stains come out completely?
Not always. Professional cleaning works very well, and most organic growth, like mold and algae, is usually removed completely.
Oil stains are a bit harder to predict. Fresh spills may come out all the way, while older, deep-set stains usually improve by 80% to 90%. The result depends on the age of the stain, how porous the concrete is, and how long the oil has had to soak in.
How do I know if my driveway should be sealed?
Sealing is a smart move for concrete and paver driveways. It helps protect the surface from stains, rain, sun, and day-to-day wear. And because these materials are porous, sealing can help stop oil, mold, and algae from soaking in and leaving marks behind.
If your driveway looks worn, blotchy, or a little tired, sealing is worth a look. The same goes if you've just had it professionally cleaned and want those results to last longer.
.avif)

.avif)