Roof Cleaning in Miami: What a Pro Visit Looks Like
Lorem ipsum dolor sit amet, consectetur adipiscing elit. Suspendisse varius enim in eros elementum tristique. Duis cursus, mi quis viverra ornare, eros dolor interdum nulla, ut commodo diam libero vitae erat. Aenean faucibus nibh et justo cursus id rutrum lorem imperdiet. Nunc ut sem vitae risus tristique posuere.
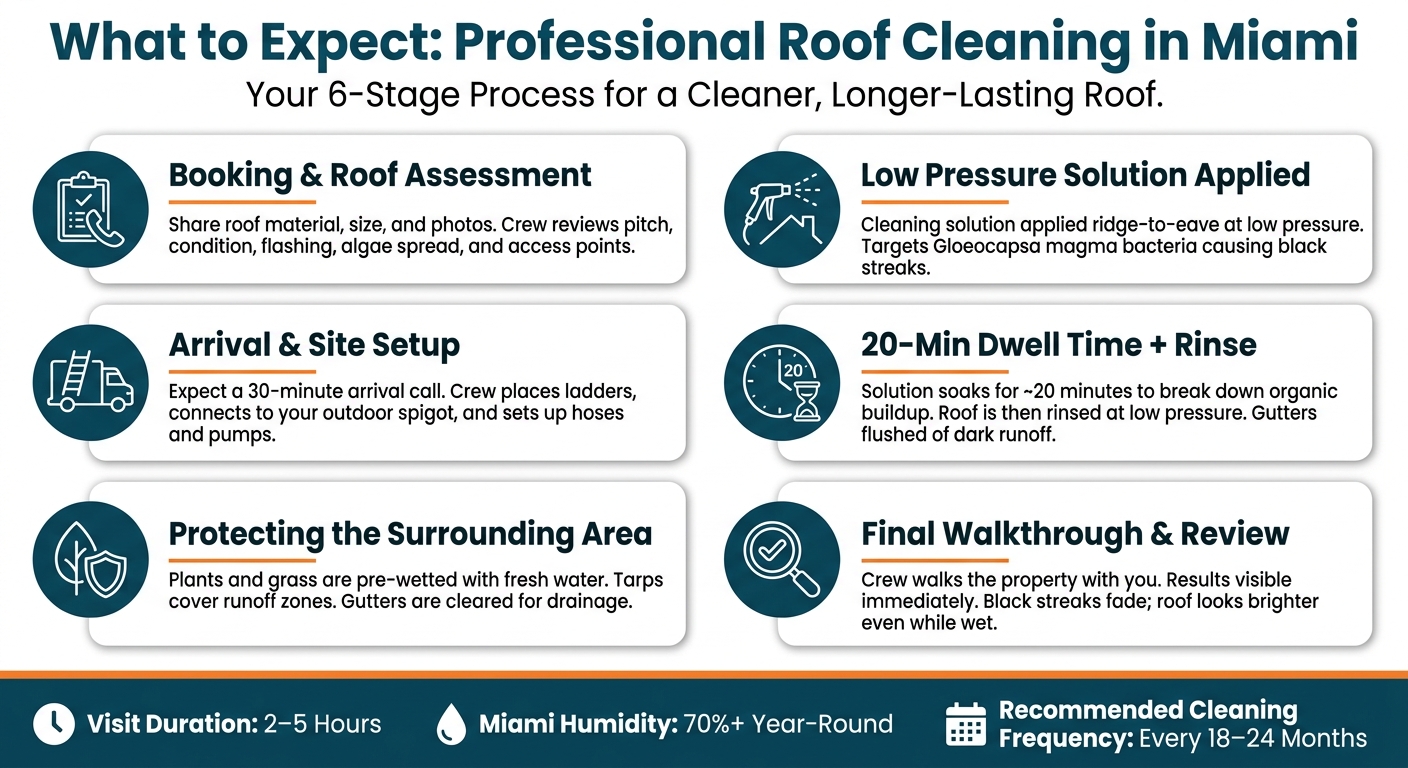
A roof cleaning visit in Miami runs 2 to 5 hours. The crew inspects the roof, sets up, protects plants and ground cover, applies a low-pressure treatment, rinses, and walks the area before leaving. You don't need to be home, but stay reachable by phone.
The process is mostly about safe prep and controlled chemistry, not high-pressure blasting. Miami's humidity sits above 70% most of the year, which is why roofs with black streaks or visible algae tend to need cleaning every 18 to 24 months.
What the visit covers:
A quote based on roof size, pitch, material, access, and buildup
A roof check for damage, leaks, flashing issues, and sealant wear
A 30-minute arrival call in most cases
Plant and ground protection before any treatment goes down
About 20 minutes of dwell time after the solution is applied
Gutter and downspout flushing after the rinse
A final review of the roof and surrounding area
Plan for a half-day. Safety, roof condition, and cleanup take as much time as the wash itself. The article below walks through each step so you know what happens before, during, and after the crew arrives.
What to Expect: Professional Roof Cleaning in Miami Step by Step
Before the Crew Arrives: Booking and Roof Assessment
A lot of the visit is set before the crew even pulls up. The details you share, plus what they find on-site, shape the cleaning plan, timing, and final quote.
What Palm Shine Pros May Ask When You Request Service
When you reach out, Palm Shine Pros may ask for the property address, roof material, and approximate square footage. That usually means whether the roof is tile, shingle, metal, or wood. Those details help the crew show up with the right gear and avoid slowdowns.
Clear ground-level photos can speed up the estimate and make it more accurate. If you can see dark streaks or other staining, it helps to snap a few photos before you call.
It also helps to share gate codes, pet details, and the spigot location. Small things like that can change setup time.
Final pricing depends on roof size, pitch, material, and buildup.
What the Initial Inspection Checks
Before any cleaning solution touches the roof, the crew does a walkthrough assessment. This is the point where the plan gets locked in. For the homeowner, it also gives a clear picture of access, safety, and job scope.
The inspection looks at the roof material and its current condition. That includes granule loss on shingles, cracked tiles, damaged flashing, and sealant condition around vents, skylights, and chimneys. If there's an active leak or a structural issue, that gets flagged right away. The crew will not clean a roof with active leaks or structural defects.
They also check how far the growth has spread, especially algae, moss, or lichen, because that affects the chemical mix and dwell time. Wood shingles call for a gentler plan than concrete tile.
The crew also reviews the area around the roof: landscaping near runoff zones, outdoor furniture, pool areas, and any windows or siding that could be affected during rinsing. If something needs extra care, they note it before the job starts.
With the roof assessed, the crew moves to setup and protection.
sbb-itb-20350f7
Arrival and Setup: What the Crew Does First
Once the inspection is finished and the scope is locked in, the crew starts setup. In most cases, you'll get a 30-minute arrival call before they show up. That gives you a short window to unlock gates, move cars, secure pets, and shut windows and doors.
You don't need to stay home for the visit. But you should stay reachable in case the crew needs access or wants to confirm something. After that, they move into equipment setup and protecting the area around the home.
Equipment Placement and Roof Access
The crew sets up hoses, pumps, and the water line using your outdoor spigot. It helps to check that the spigot works and is easy to access before the appointment.
They also place ladders based on the roof layout so they can get up safely. Once access is in place, they turn to site protection.
How the Crew Protects the Surrounding Area
To help shield landscaping, the crew pre-wets plants, grass, and shrubs near the roofline with fresh water before applying any solution. Areas where runoff may collect can also be covered with tarps for added protection.
The crew moves any remaining items out of the work zone. They also clear gutters and downspouts so rinse water can drain the way it should, and they rinse nearby walls and windows to cut down on residue. Before work starts, they do one more check of windows, doors, and access points.
With the site protected, the cleaning application can begin.
The Roof Cleaning Process: Application, Dwell Time, and Rinse
With the site protected and the crew set up, the cleaning starts.
Applying the Cleaning Solution
Once the site is ready, the crew begins the roof treatment. They apply a low-pressure cleaning solution from the ridge down to the eaves so the roof gets even coverage and runoff flows the right way.
This solution goes after the bacteria that cause black streaks, especially Gloeocapsa magma.
Dwell Time, Progress Checks, and Rinsing
The dwell time is usually about 20 minutes, which gives the solution time to soak into porous surfaces and break down organic buildup. During that time, the crew checks the roof’s progress. If they rinse too soon, living roots can stay behind, and that can lead to regrowth sooner than expected.
Once the buildup has loosened, the crew rinses the roof with low-pressure water. That helps wash away loosened algae, mold, and bacteria without harming shingles or tile.
You may notice dark runoff in the gutters. That’s normal. As the loosened debris washes off the roof, the crew flushes the gutters and downspouts to clear it out.
After the rinse, the crew does one last check and explains what changes you can expect to see next.
After the Cleaning: Results, Timing, and Next Steps
Immediate Results and Final Walkthrough
Right after the rinse, the difference is easy to see. Black streaks start to fade as soon as the solution kicks in, and the roof looks brighter and cleaner, even though it’s still wet. It hasn’t dried yet, but the change shows up right away.
If the crew leaves the final rinse to rain, some loosened growth may stay on the surface until the next rainfall clears it off. After the roof dries all the way, the color usually looks more even and natural.
Before the crew packs up, they’ll walk the property with you. This is the time to look over the treated areas, ask any follow-up care questions, and make sure the gutters were flushed.
Visit Length and What Affects the Quote
After the walkthrough, most homeowners want to know two things: how long the visit took and what shaped the price.
Most residential roof cleaning visits in Miami take 2 to 5 hours from setup to cleanup. Bigger roofs, multi-peak layouts, or heavy algae buildup can push the job closer to the high end of that range.
Final pricing depends on a few job-specific details:
Roof size
Pitch
Material
Amount of buildup
Ease of access
Instead of relying on a rough ballpark figure, it makes more sense to request a custom quote based on your roof. Palm Shine Pros provides estimates tailored to your home’s actual conditions.
Conclusion: What to Expect From Start to Finish
From the first booking call to the last walkthrough, a professional roof cleaning visit follows a simple sequence: assessment → arrival and site prep → solution application → dwell time → rinse → final check. For most Miami homeowners, the whole job is wrapped up in a single afternoon.
One detail to plan for: Miami’s humidity stays above 70% for much of the year, and salt air from the coast speeds up algae return. Most roofs here need cleaning every 18 to 24 months to stay ahead of buildup. Homes under heavy tree canopy, like those in Coconut Grove or Pinecrest, may need it every year.
Professional soft washing is meant to clean your roof without beating it up. Instead of blasting the surface with high pressure, it uses special, eco-friendly cleaning solutions and low pressure that feels more like a garden hose.
That matters because the goal is to remove algae and other organic growth without using the kind of force that can harm shingles or tile.
Before any treatment starts, pros also inspect the roof to make sure it’s in stable enough condition for the work.
Do I need to do anything before the crew arrives?
Not much, honestly. When the crew arrives, they’ll take care of the main setup. That usually includes figuring out your roof material, checking for existing damage, and protecting nearby landscaping or moving items around the work area.
You don’t have to be home during the service. That said, it’s helpful to be available in case the technicians need to ask a question.
If you’re planning other exterior projects, schedule the roof cleaning first.
How long will the roof stay clean in Miami?
In Miami, a roof usually stays clean for one to three years after a professional soft wash.
That said, Miami’s humid weather and salt air can bring grime back faster than many homeowners expect. Because of that, a lot of homeowners book maintenance every one to two years.
A few things can shorten that timeline:
Heavy shade
A spot close to the coast
High moisture exposure
If your home deals with any of those, algae or black streaks may come back sooner.
.avif)


.avif)